background

Friday, July 29, 2011

Signs


I love being able to make a fun craft in 10 min. I love being able to give a homemade gift. And I love that with my Silhouette I can do both! I dont know about you, but for our family reunions we always have some sort of raffle, here are a couple of things I made for the raffles.


A simple cute Welcome sign, and a cute flag made out of 2*4s and mod podge scrapbook paper.  Here is a simple wedding gift idea, this one is for my cousin. I also am doing the brides hair for her wedding, (im not THAT cheap! lol)

Just a simple sign out of old barn wood with their last name. Here is a couple of pics of my sign at my back door. I bought a ugly gold frame from the dollar store, spray painted it, put vinyl on the glass and cute outdoor fabric inside the frame. The post is an old bed rail that my sister-in-law gave me. I painted it black, sanded it a little added a bracket and wala!


My mom gave me this cute black bench, it is a little toy box which is perfect for my kids outdoor toys, like shovels, rakes, trucks.. perfect! Thanks mom!

Thursday, July 21, 2011

Umbrella skirt

So, some of my friends have been after me to "teach" them how to sew. Well, I am NOT the best seamstress, and end up winging it most of the time.  So, every once in a while i will try and post something I have made, and instructions. This skirt is really easy, and i didnt do pics while i was doing it, so bare with me! 
You will need 3/4 yard main fabric
1/4 yard belt fabric
elastic

You might have extra fabric, but i always guess!!


Measure from the waist to where you want the skirt to be. Add 3 1/2 in lenthwise for seam allowance and it gives you enough fabric at top to add your elastic. Also measure your little ones waist, i always almost double it, cause i like it to be a "puffy" or "twirly" skirt.


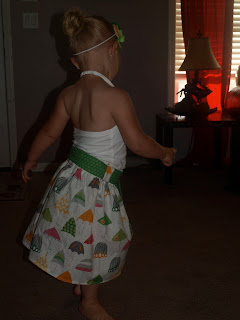
Cut fabric. Then sew your fabric lengthwise right sides together, you might want to serge or zigzag stitch after you straight stitch. Then for the bottom, fold over about 1/4 in iron, then fold again and stitch for your hem. At the top of the skirt fold over 1/4 in and then fold over about 2 in, allowing room to put your elastic. sew, leave about an 1 in opening so you can put your elastic in. Remember your measurement for the waist? I like to cut the elastic about 1 1/2 in shorter. Get your elastic and put it through the top, sew elastic together, then sew your opening.  Add a cute decorative stitch on the top of skirt where your elastic is to help hold elastic in,  I did 2, just my preference, totally up to you. Then with your other fabric cut for your belt. Waist measurement times 2 by 6 in. sew right sides together, leaving one end of your tube unsewn, flip right side out, iron. Now sew the last edge. YAY! You are done!

I hope I did ok explaining. If you need help let me know!

Thursday, July 14, 2011

New Haircut!!

For the last little while I have been trying to grow my hair out, cause as most men, my husband likes LONG hair (he would love it down to my butt!) But, its really not me! I like short sassy haircuts, so I called my awesome friend Stevey and she worked her magic! My husband hasnt seen it yet, and I didnt tell him I was going to get it cut.. although lately he has been telling me he likes my hair short and scandalous!Here is a before and after pic.


Thanks Stevey! Absolutely LOVE it!! I feel like myself again.. with the added sass and all.

Tuesday, July 12, 2011

Yep, Started a blog!!

Hey Guys!
Yep, I finally broke down and started a blog. I dont know how long it will last, but i decided to try it! I think it will be good considering I havent scrapbooked in FOREVER, and im on the computer alot, maybe it will help! Anyway, Welcome to the Parrish family blog! Here are a few recent pictures of the kids, I am trying to learn more about my camera so one day I will be able to take some good pics!! 


So, tell me what you think. What do I need to do to get better quality pictures? 
Oh, and remember I am new to the blogging thing.. SOOO... if any of you have suggestions.. feel free to help me out!